Part 1. Signup & Login
1.1 Download & Install
The first step to using PDNob PDF Editor is downloading and installing the software on your computer. Whether you're using Windows or macOS, the process is straightforward.
-
Download on Windows:
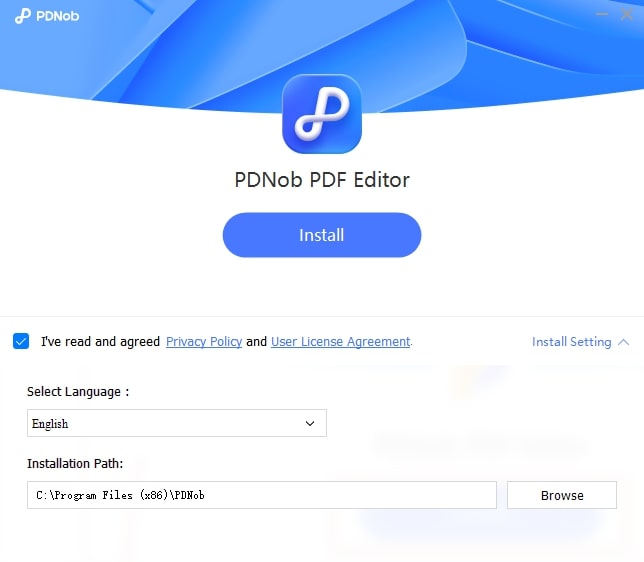
- Step 1: Click the Free Download button to download the installer first.
- Step 2: Click the file in the Downloaded folder of your browser, generally it will appear on teh top-right corner of your browser.
- Step 3: Click the downloaded file to install, after that you can launch the product to use.
-
Download on macOS:
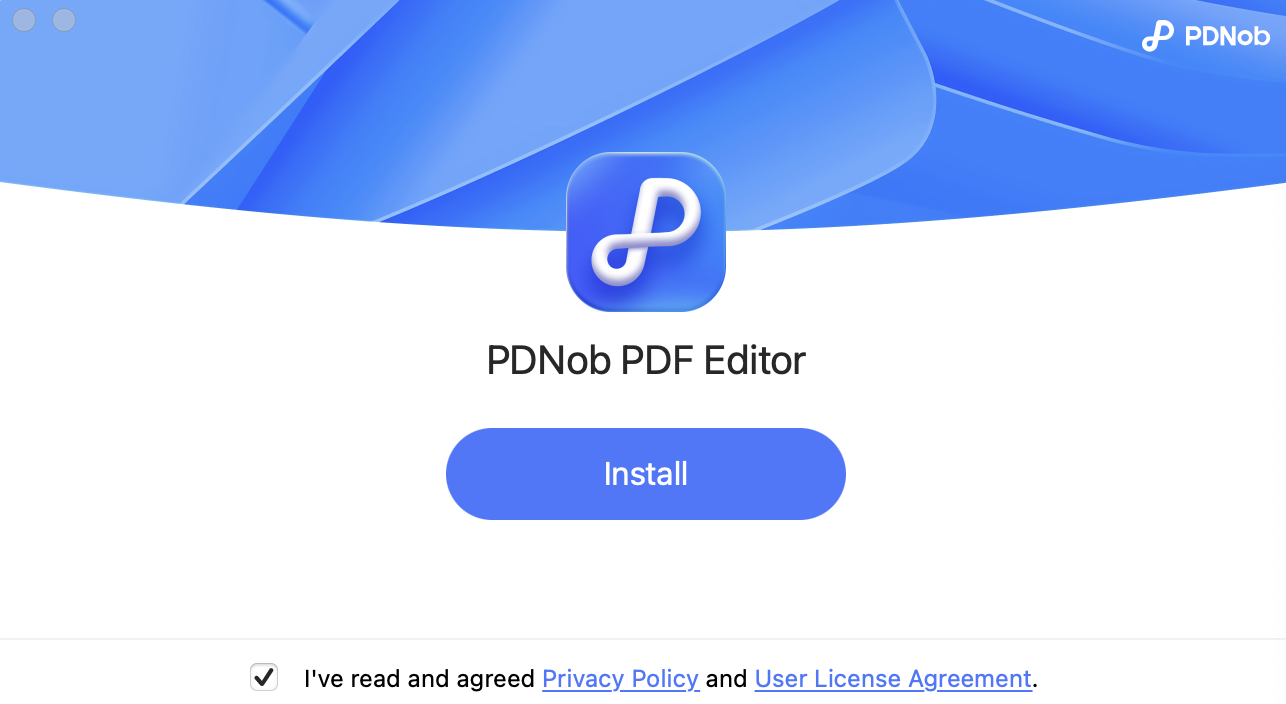
- Step 1: Click the Free Download button to download the installer first.
- Step 2: Click the file in the Downloaded folder of your browser, generally it will appear on teh top-right corner of your browser.
- Step 3: Click the downloaded file to install, after that you can launch the product to use.
1.2 Create an Account
- Step 1: Launch the PDNob PDF Editor from your desktop or start menu.
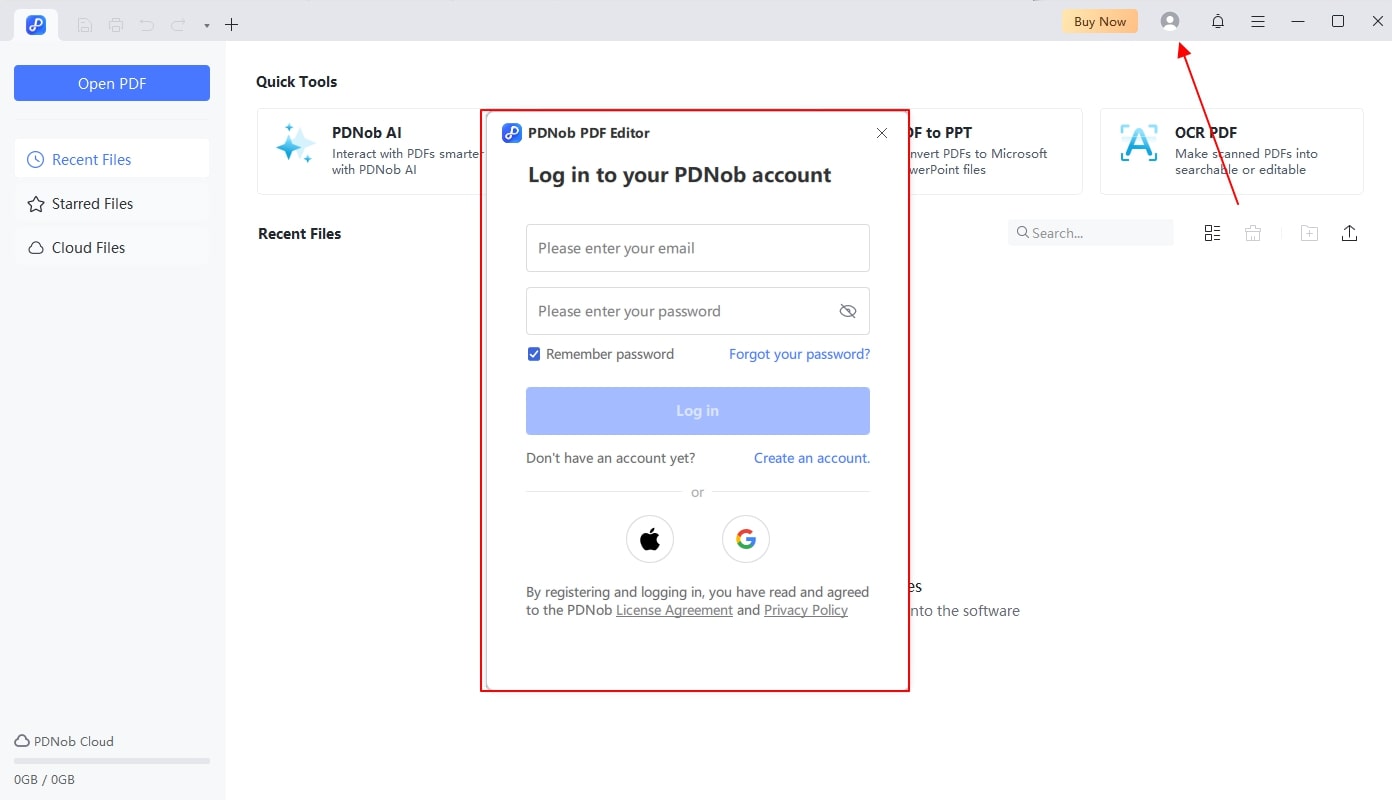
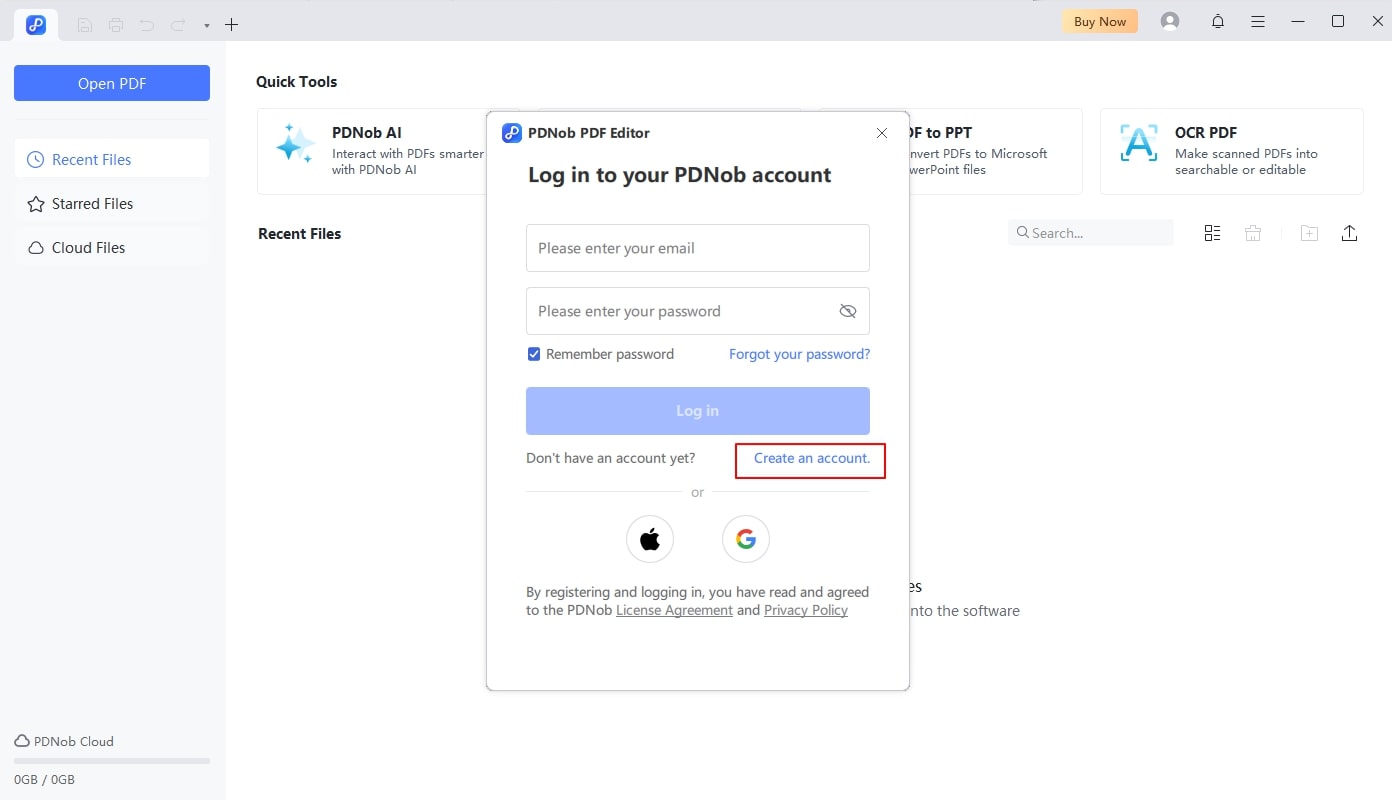
- Step 2: On the main interface, locate the "User Account" button, typically located on the top right corner.You will be prompted to enter your account information if you already have an account, after entering the account information, you will login directly.
- Step 3: If you have not signed up any account yet, please click the "Create an account" button to sign up an account. Or you can also click the Apple or Goole button to create an account using your Apple account or Google account directly.
To unlock the full range of features that PDNob PDF Editor offers, you'll need to create an account. An account also allows you to save your settings and access premium features across multiple devices.
Click the "Buy Now" button, you can choose different plan to pay for it, and the paid version will have fully access to all the features without any limitation.
1.3 System Requirements
Before installing the software, ensure that your system is compatible with the PDNob PDF Editor. The minimum system requirements for PDNob PDF Editor are:
- Operating System: Windows 10 and later of 64-bit / macOS 10.15 and later
- Processor: 1.3 GHz or higher (X86 compatible) or ARM processor
- RAM: At least 2GB of RAM (4GB recommended)
- Storage: Minimum of 2GB for Windows system, and 5GB for macOS
Part 2: How to Use
PDNob PDF Editor is packed with features to help you handle a wide range of tasks. This section will provide detailed instructions on how to use each tool effectively.
2.1 PDF AI
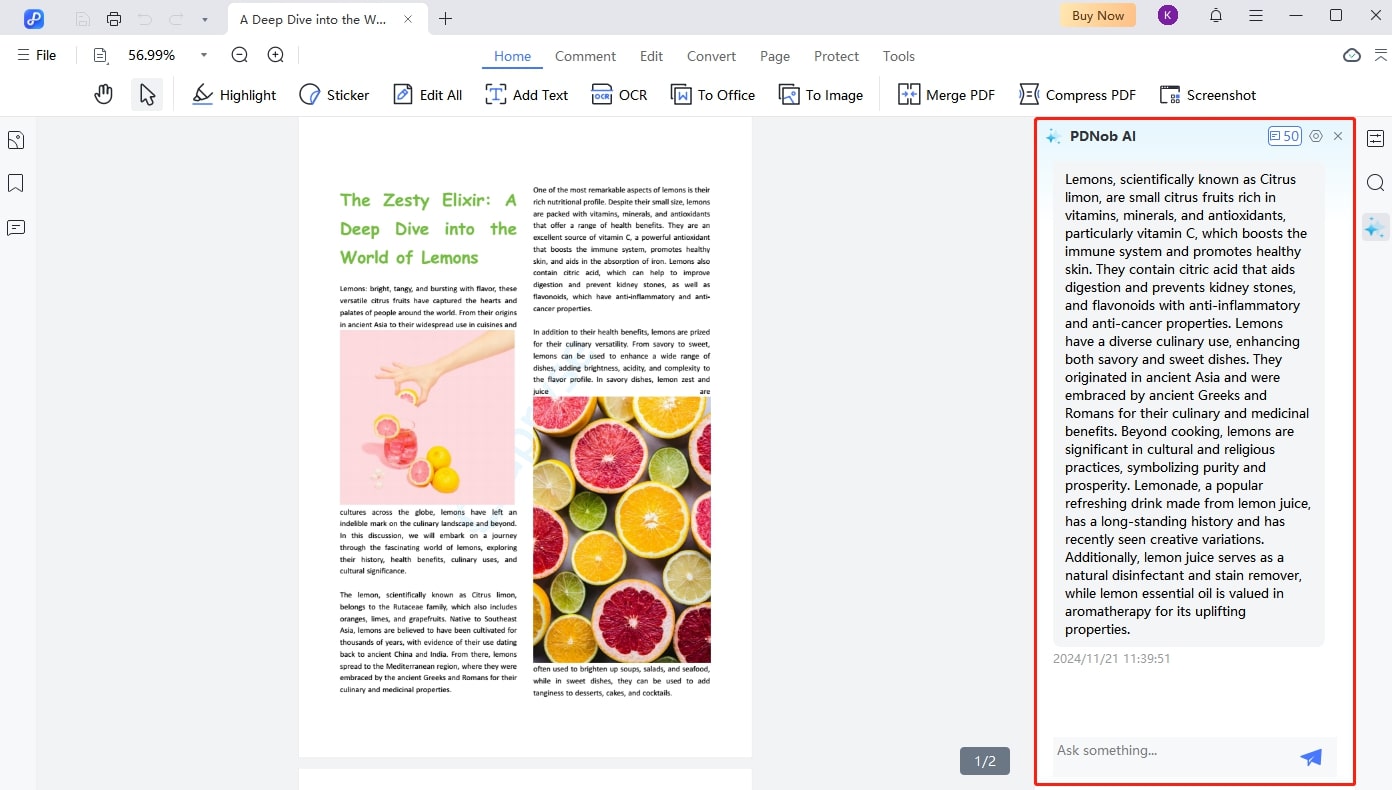
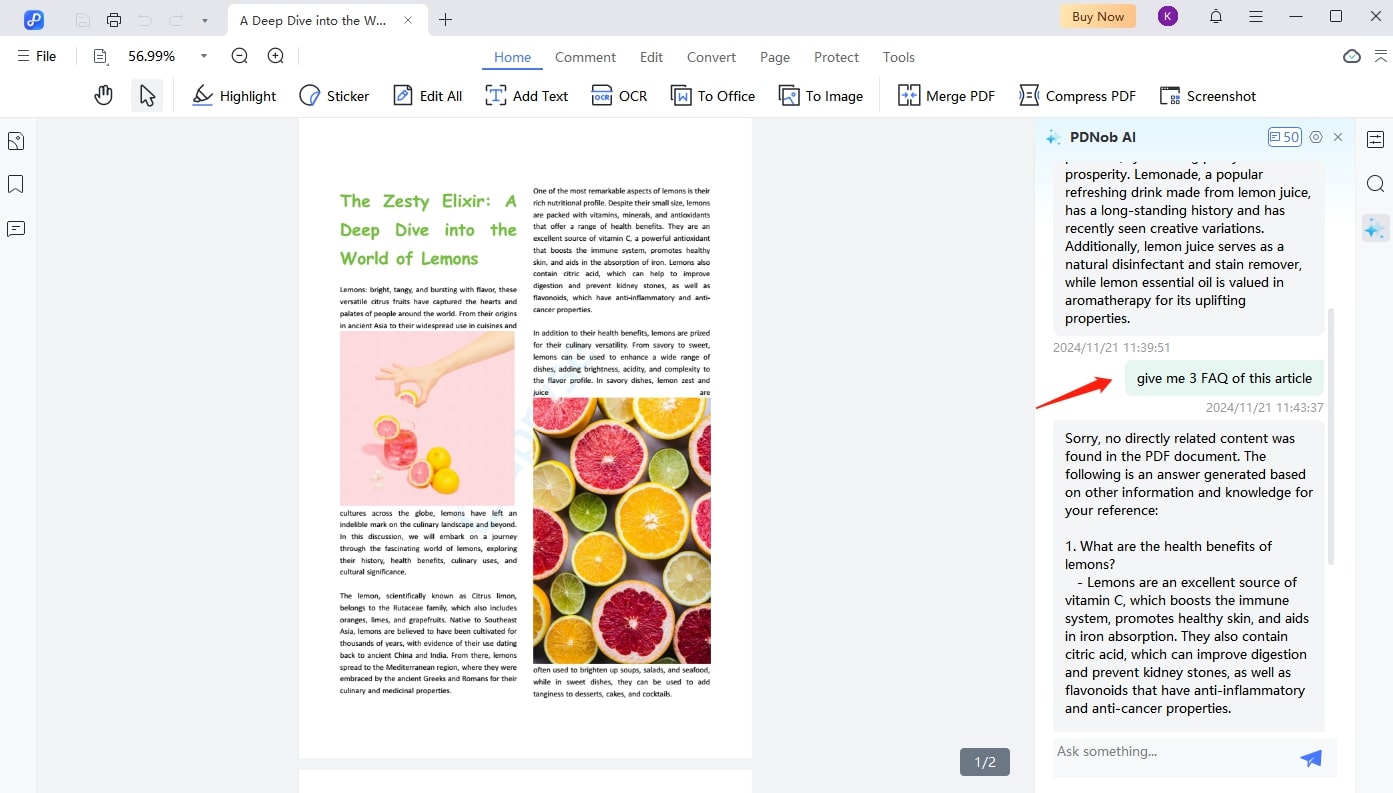
Its AI feature is powered by Chatgpt 4omini that can help to summarize, analyze, and chat with PDF content. This tool is particularly useful for reading and understanding long documents, extracting data, or even generating new insights from the text.
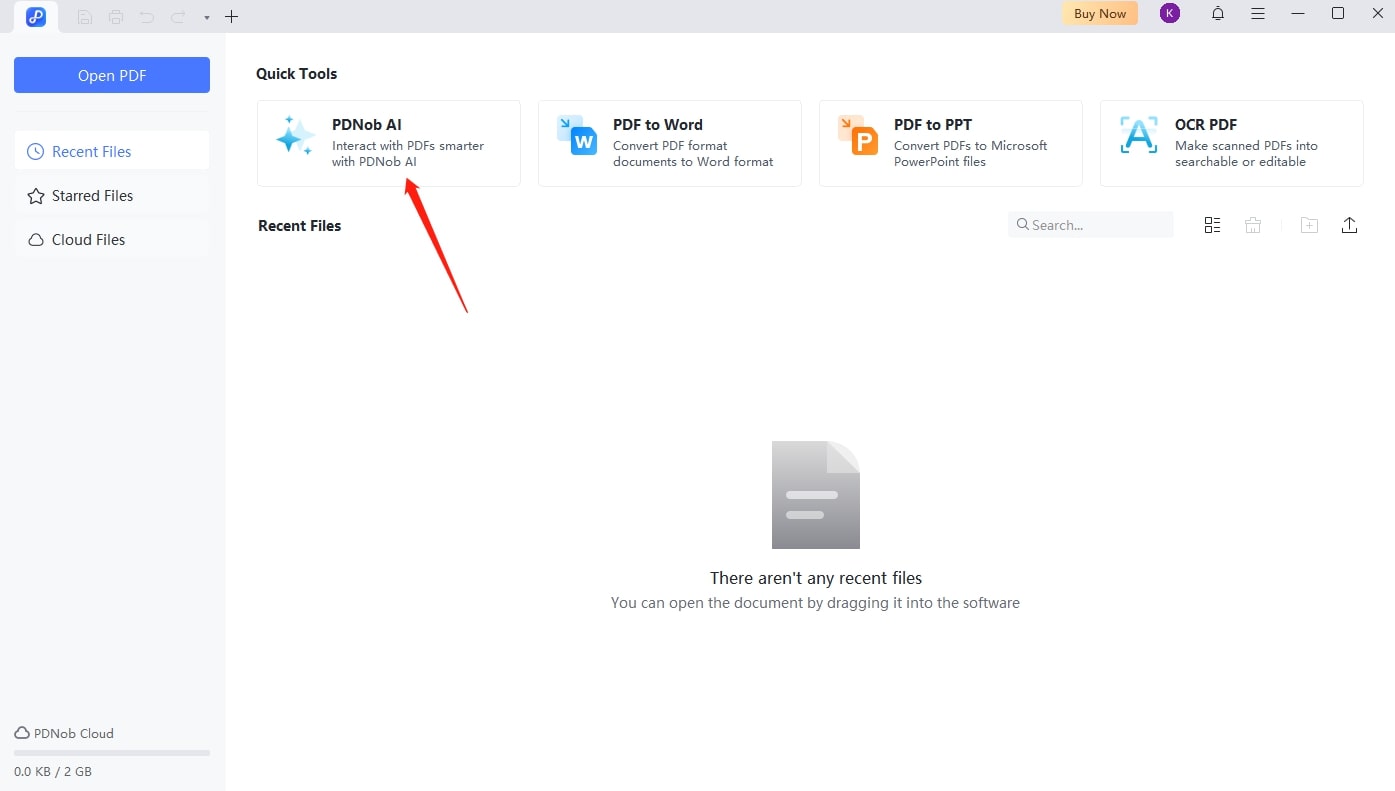
- Step 1: Open PDNob PDF Editor and select "PDNob AI" from the menu on the left.
- Step 2: Upload the PDF document you wish to analyze.
- Step 3: You can click the "Start" button to generate a summary of your entire content using PDNob AI. This feature will quickly analyze your document and provide a concise overview of the key points.
- Step 4: If you provide a prompt to PDNob AI, it will either extract the relevant answer from your document or generate a response based on your input, you can start to chat with it based on your PDF document.
2.2 Convert PDF
The Convert PDF feature allows you to transform your PDF files into other formats such as Microsoft Word, Excel, PowerPoint or images, etc. This is ideal when you need to make extensive edits to a PDF or extract data for other applications.
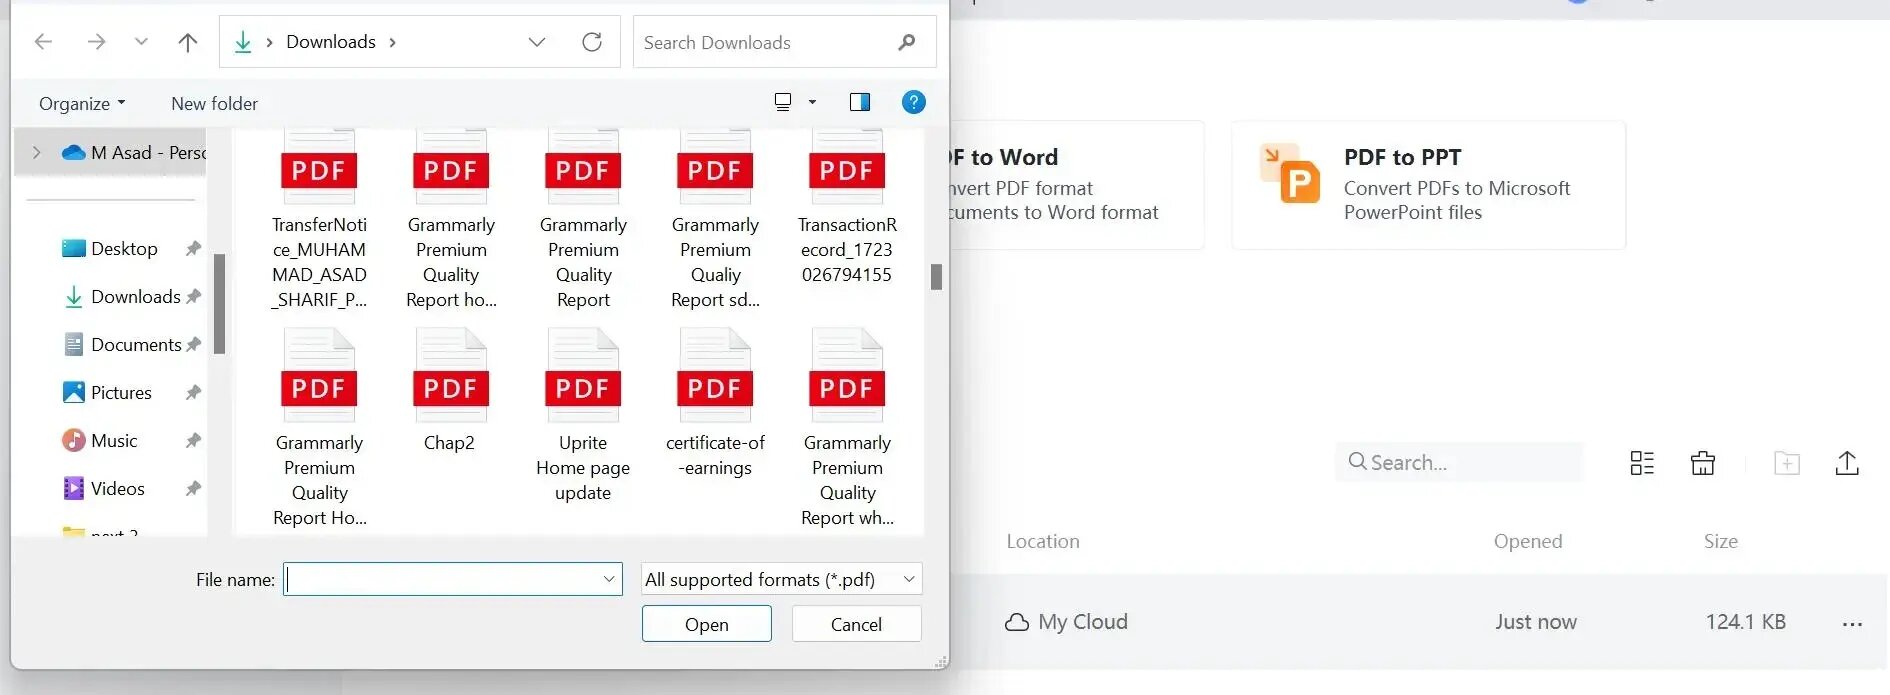
- Step 1: From the main interface, you can select "PDF to Word" or "PDF to PPT" option. Or you can choose to open a PDF document first, then click the "Convert" button to process.
- Step 2: Choose your PDF file to open.
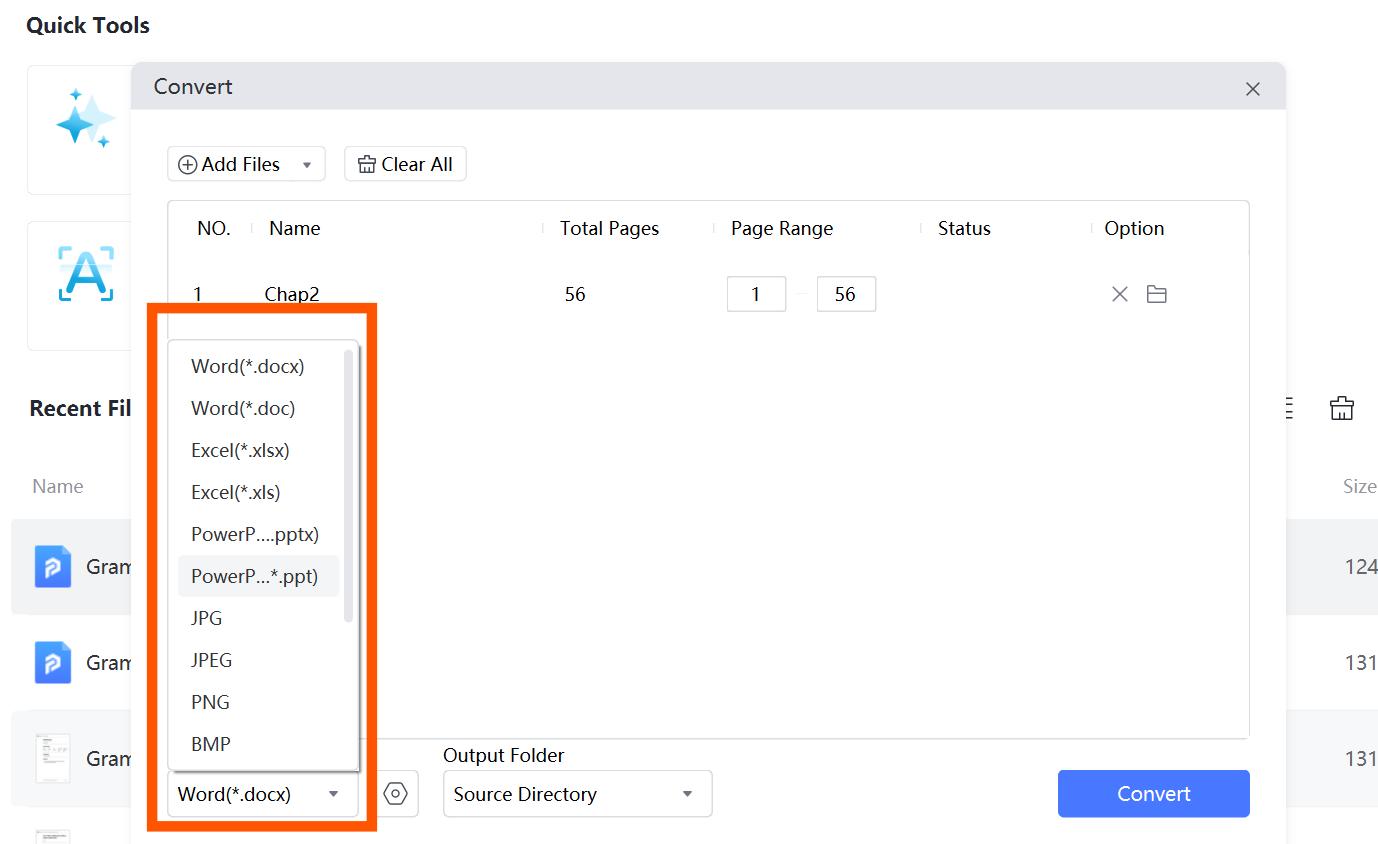
- Step 3:Choose the output format from the options provided (Word, Excel and many other formats etc.).
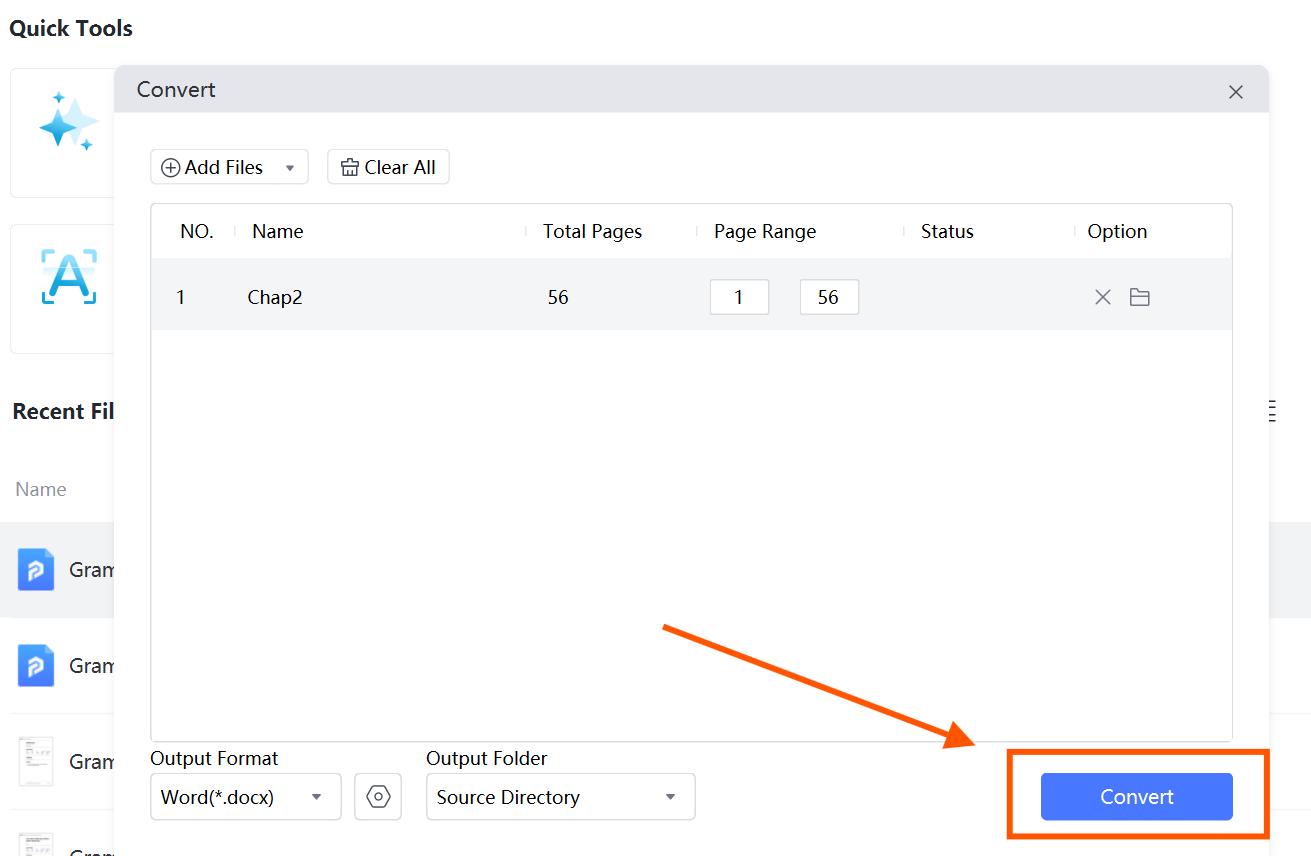
- Step 4:Click "Convert" button to start the process. Once done, you can find the converted file in the output folder.

2.3 Edit PDF
PDNob PDF Editor makes editing PDFs simple. Whether you want to adjust text, add images, or modify page elements, this PDF tool offers full control over your documents.
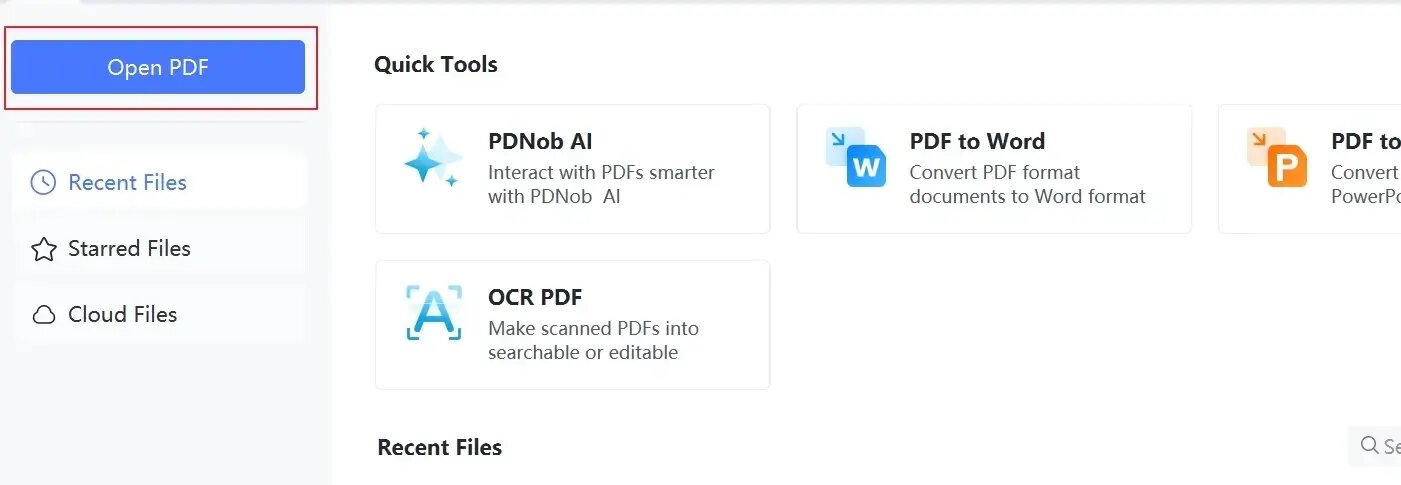
- Step 1: Click the "Open PDF" button in the main interface.
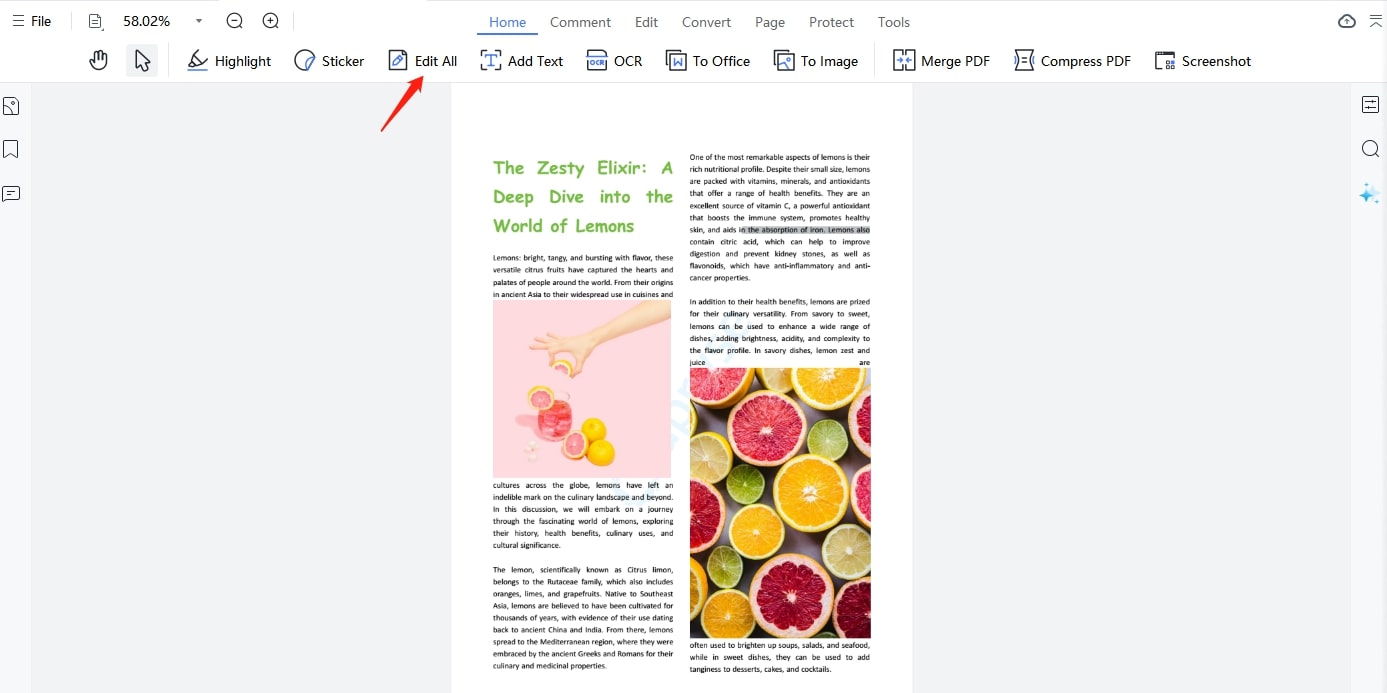
- Step 2: Click the "Edit All" button.
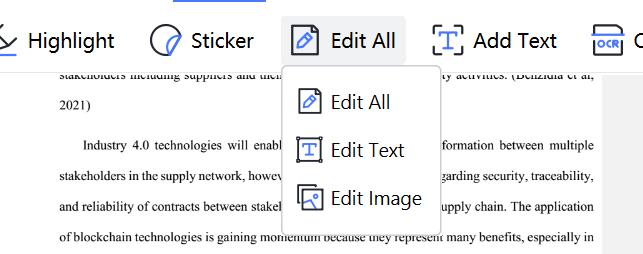
- Step 3:When you click on "Edit All," you’ll see multiple options, including "Edit Text" and "Edit Image", which allowing you to modify text or images, or both of them in the document.
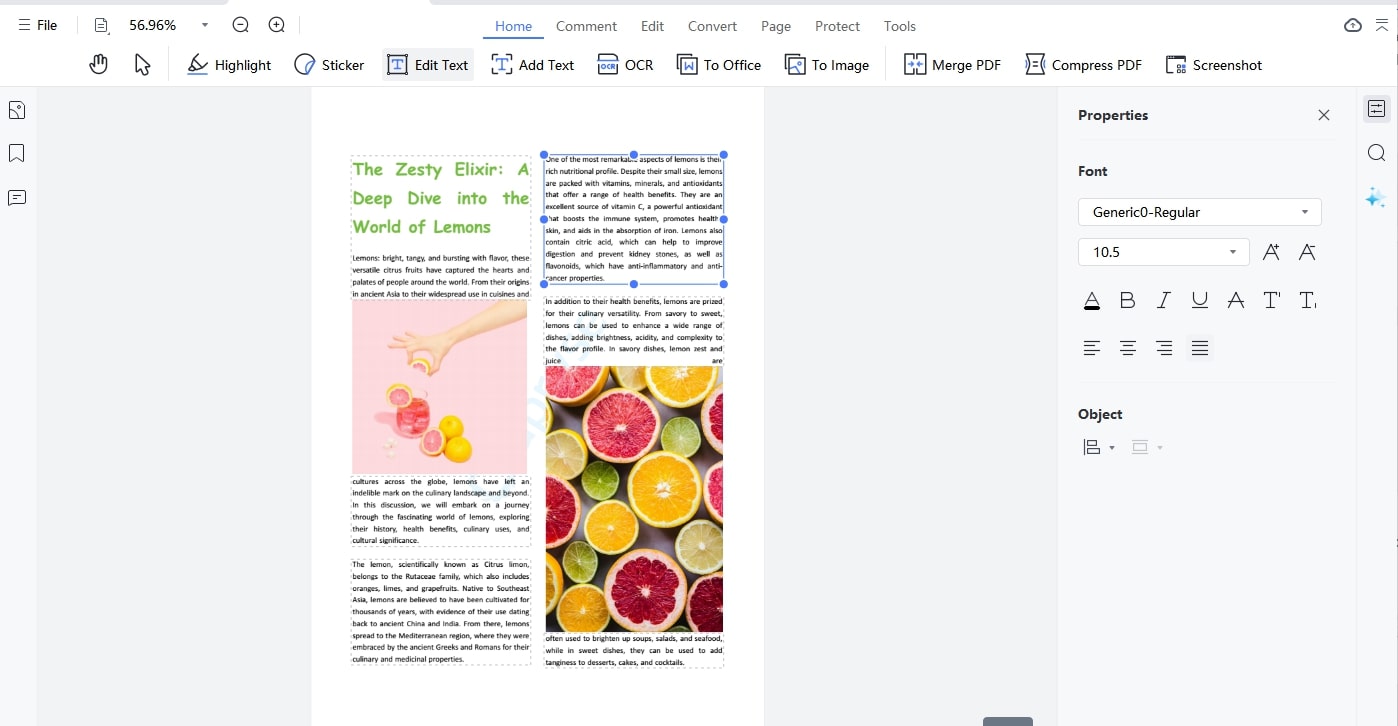
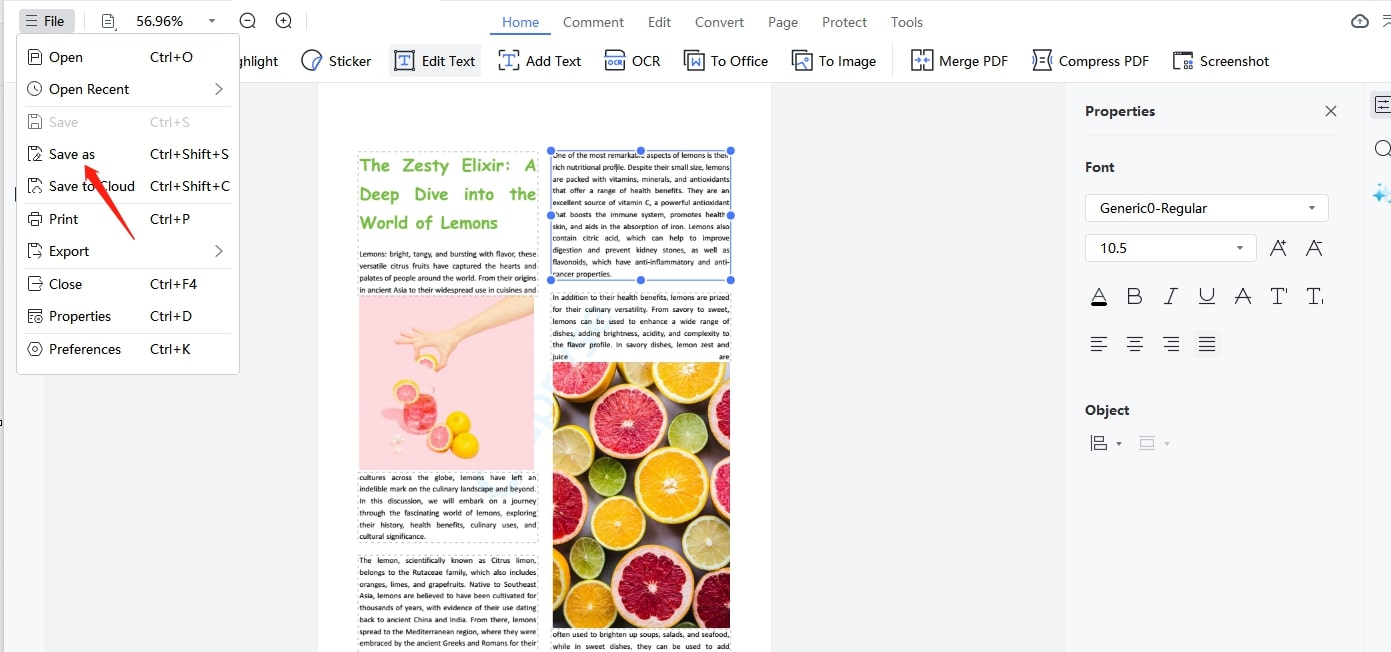
- Step 4: Click on any text or object to start editing. You can add, delete, or modify text, resize images, and rearrange the layout. Additionally, you can change the text properties by choosing different font styles, colors, font sizes and access various other editing options on the right side of the screen.
- Step 5:After making your edits, click "File" tab on the left to save it. You can choose "Save" that is save the changes in your original PDF file. Or you can choose "Save as" that is to save the modified PDF file to a new file, in this way, you still have your orignal unchanged PDF file.
2.4 OCR PDF
OCR (Optical Character Recognition) allows you to extract text from images or scanned PDF documents. This feature is perfect when working with scanned books, contracts, images or documents that were originally printed.
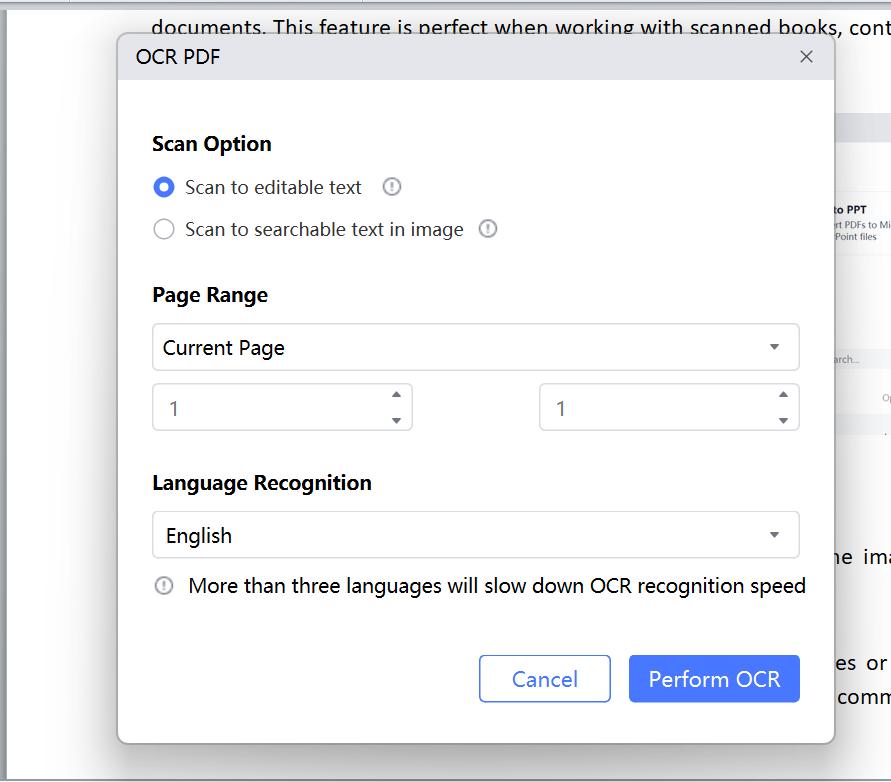
- Step 1: Open the "OCR PDF" tool in the PDNob menu.
- Step 2: "Scan to Editable Text" or "Scan Searchable Text in Image," allowing you to either edit the text directly or search the text only.
- Step 3:Now select the "Pages" and the "Languages" of your document content, then click on "Perform OCR". Then the OCRed file will be opened in it automatically, then you can click the Edit tab to edit the text as you need.

2.5 Annotate PDF
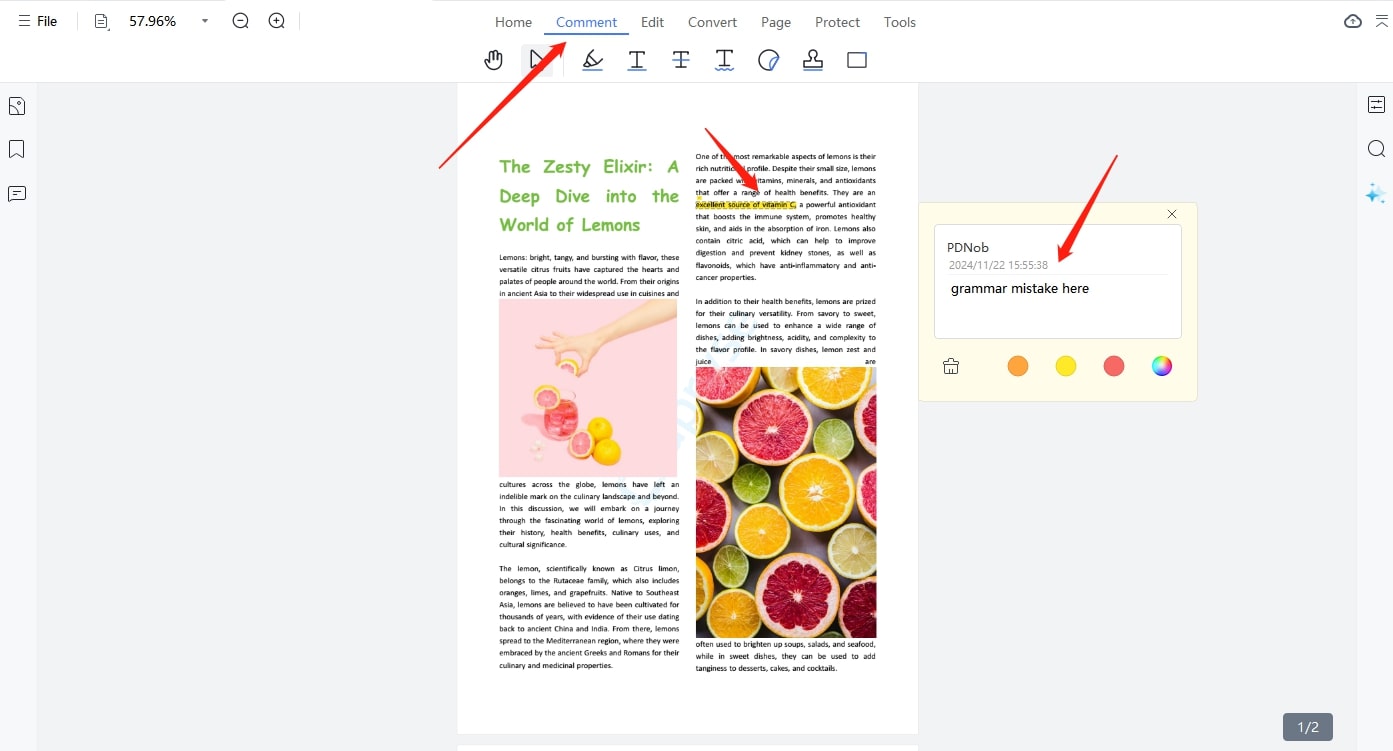
Annotating PDFs is vital when reviewing documents with colleagues or marking important sections for yourself. PDNob PDF Editor provides various tools to add comments, highlight text, or even draw on the document.
- Step 1:After opening a PDF file in it, click the "Comment" tab, you can use the highlighting tool to emphasize sections of text or the sticky notes feature to add comments.
- Step 2: You can also right-click the highlights or notes you added to change its properties as you want. After making the annotates as you need, click the "Save" or "Save as" button to save the changes.
2.6 Organize PDF
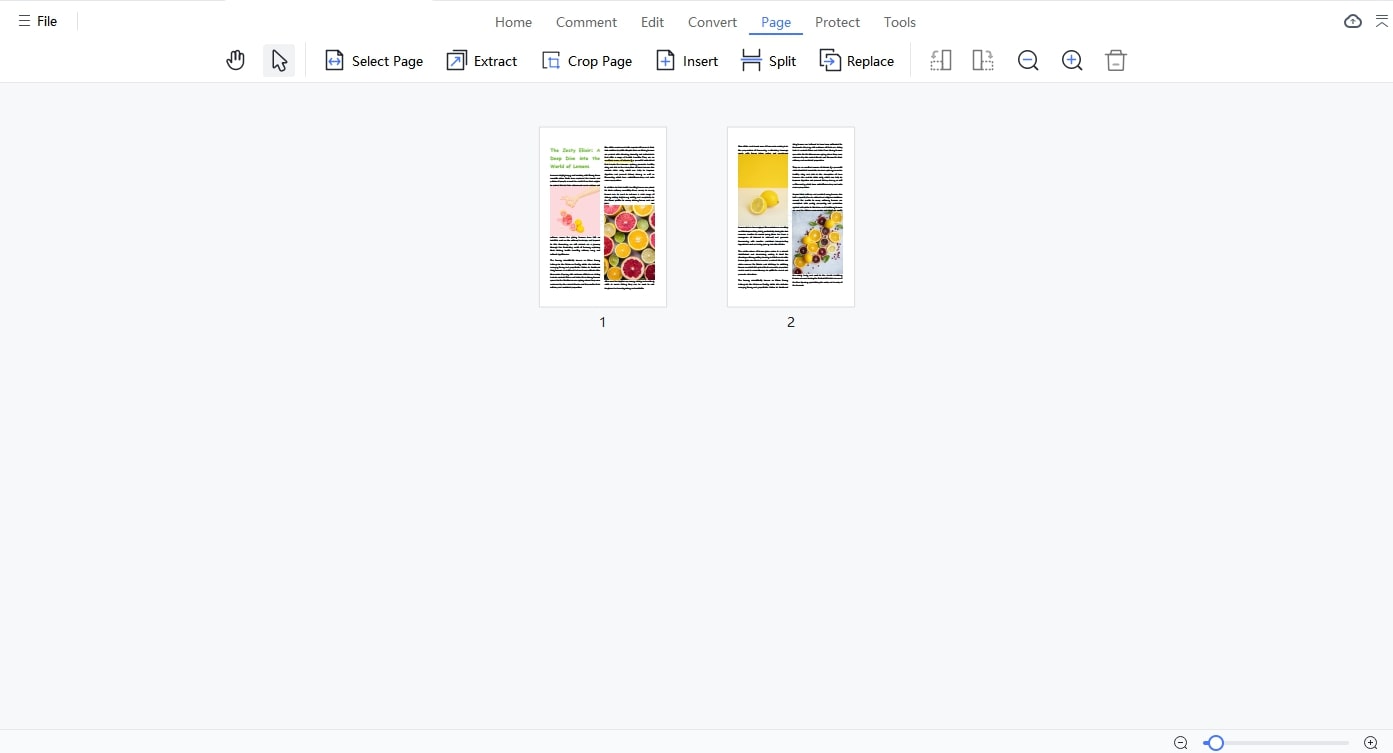
Organizing large PDF files can be challenging, but PDNob makes it easier with its Organize PDF tool, allowing you to reorder, insert, or delete pages.
- Step 1: After opening your PDF document in it, click the "Page" tab.
- Step 2: Drag and drop pages to reorder them, insert, split or select specific pages to delete or rotate.
- Step 3:Once finish the changes, click to save or save as it.

2.7 Create PDF
PDNob PDF Editor also allows you to create new PDFs from scratch or by compiling documents and images into PDF format files.
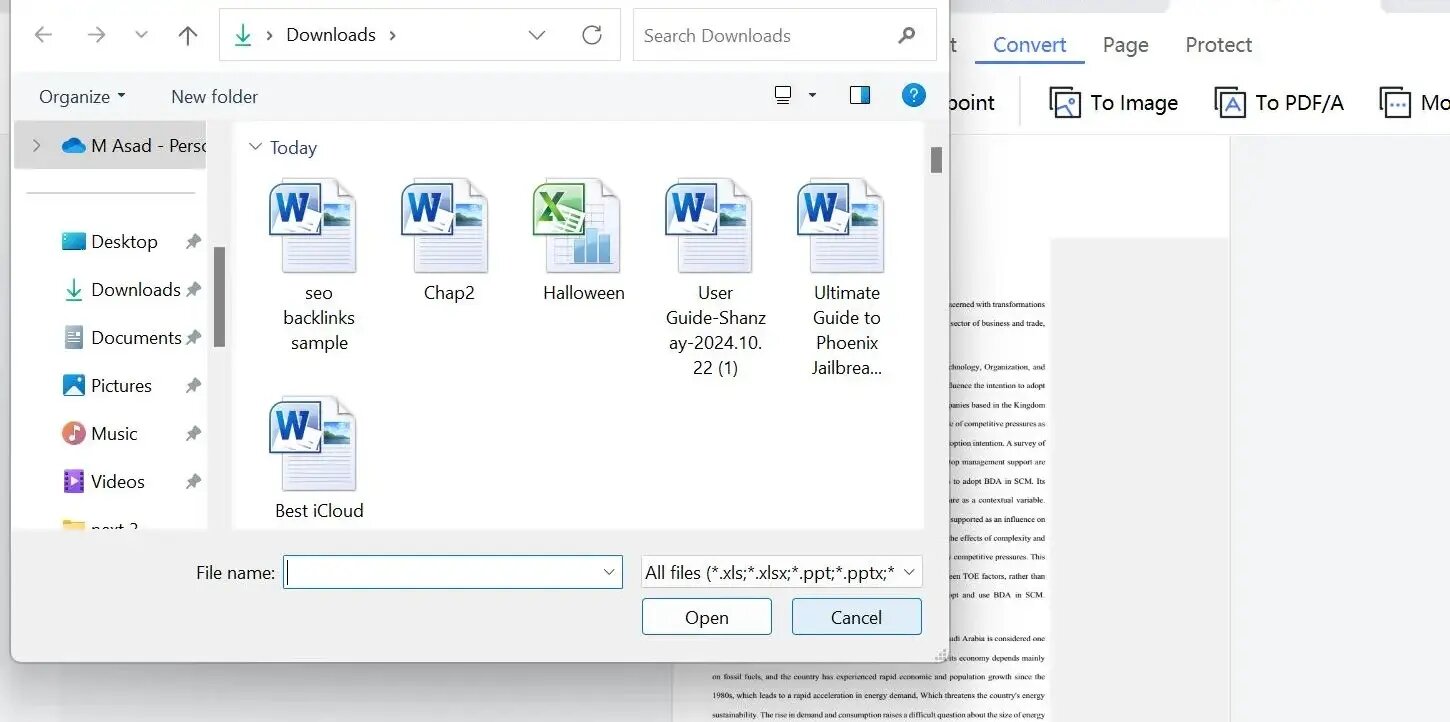
- Step 1: Click on "Convert" from the top menu, then select "Create PDF" from the dropdown menu to create PDF from your selected file.
- Step 2: Upload documents or images that you want to create into a PDF.
- Step 3:It will be opened in the product automatically, and you can click the "File">"Save" button to save it as a .pdf format file on your computer.

2.8 Protect PDF
Security is crucial when dealing with sensitive information, and PDNob's Protect PDF feature ensures that your documents are safe from unauthorized access or modifications.
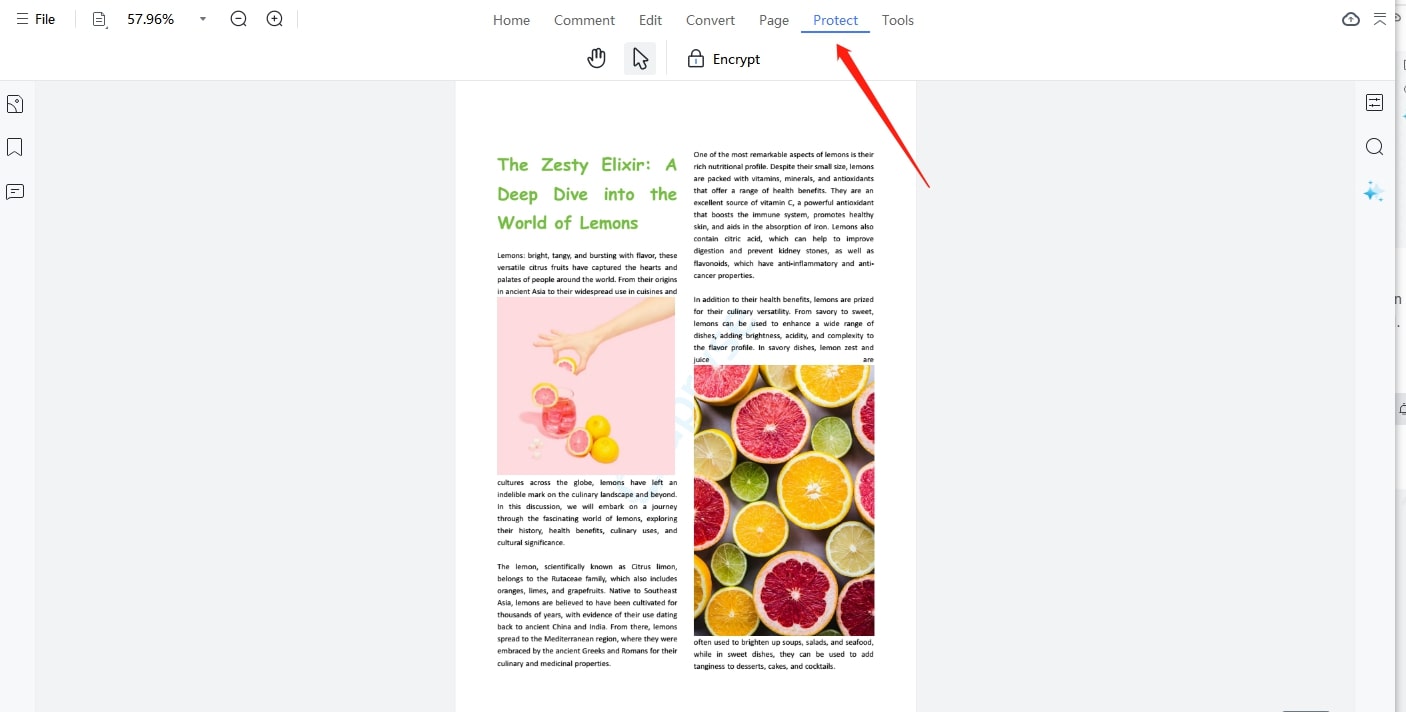
- Step 1: After opening a PDF file in the product, click the "Protect" tab from the menu.
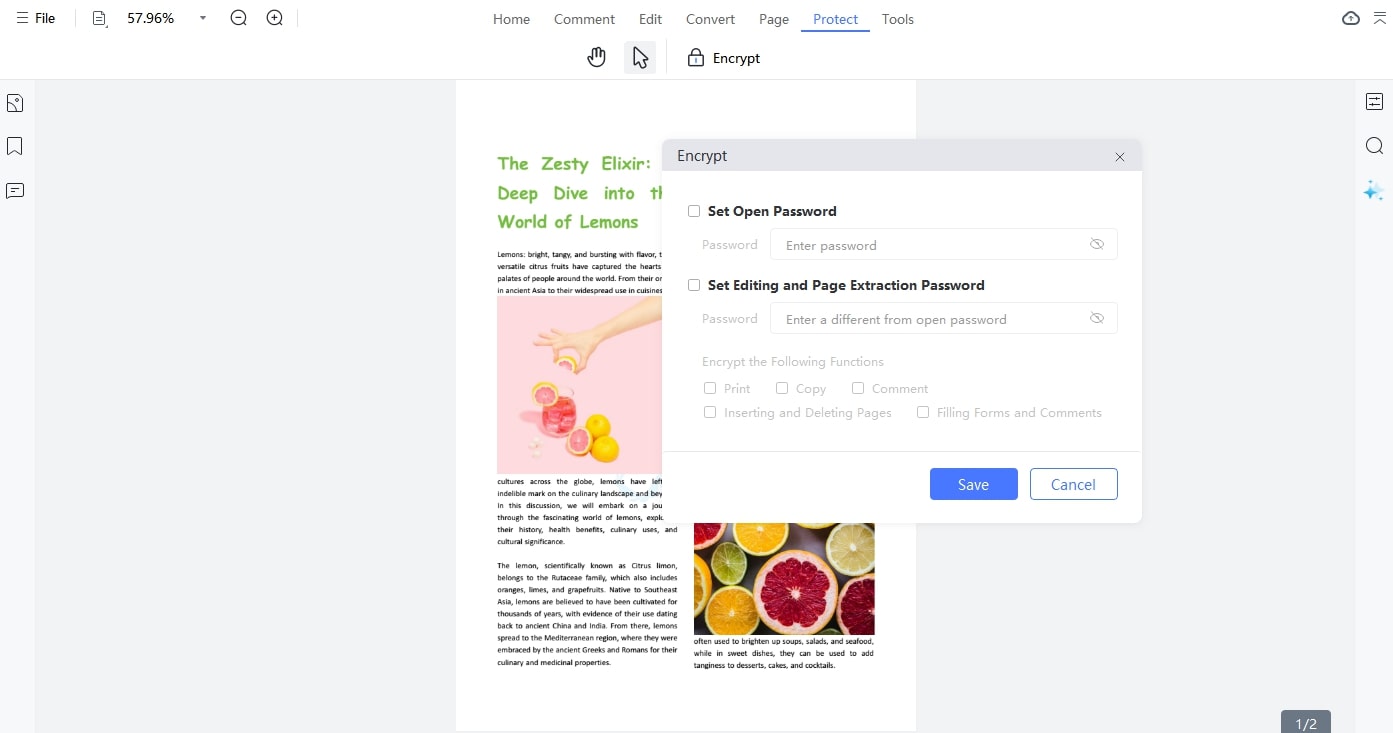
- Step 2: Set a password for the document to restrict access, or adjust the permissions to allow only certain actions, such as viewing but not editing. You have both option just file open and other file editing password. You have multiple options to allow just print, copy, comment etc.
- Step 3: After setting this, you can click the "File">"Save as" button to save it on your computer.
2.9 Print PDF
When you're ready to create a physical copy of your PDF, use the Print PDF function within PDNob PDF Editor.
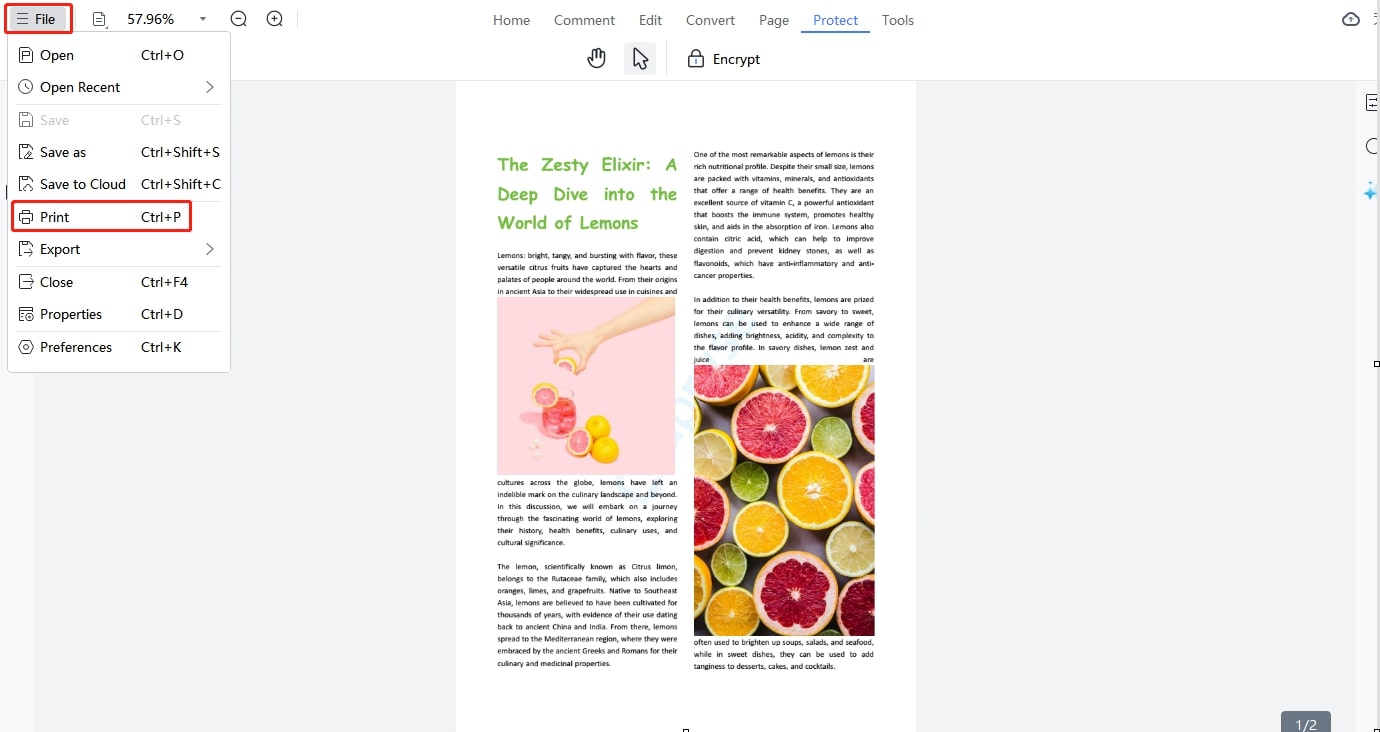
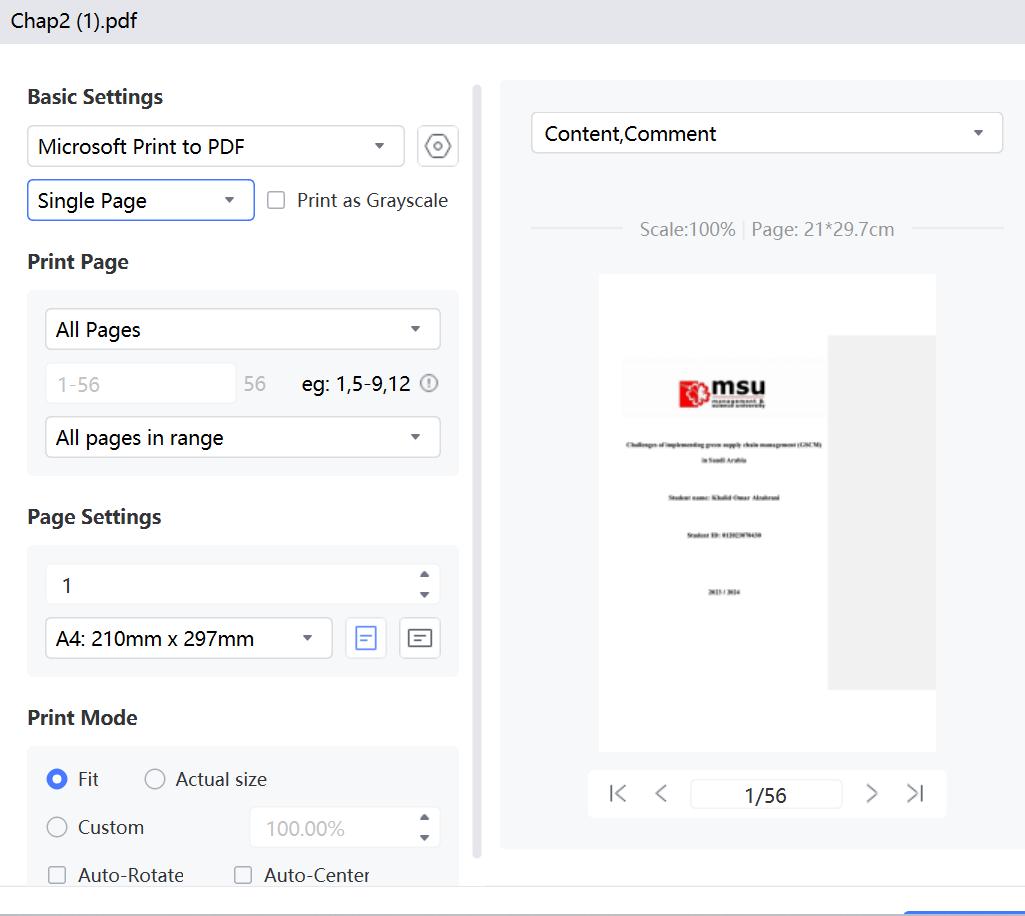
- Step 1: Open the PDF you wish to print. Click "File">"Print"
- Step 2: In the pop-up window, you can adjust your printer settings as needed (printer, paper size, orientation, etc.). You can see the multiple options before printing like choose page number of page everything.
- Step 3: Click the "Print" directly.
2.10 Read PDF
For simple viewing, PDNob PDF Editor enables you to view and read PDF documents in different modes, and also navigate through your PDF with ease.
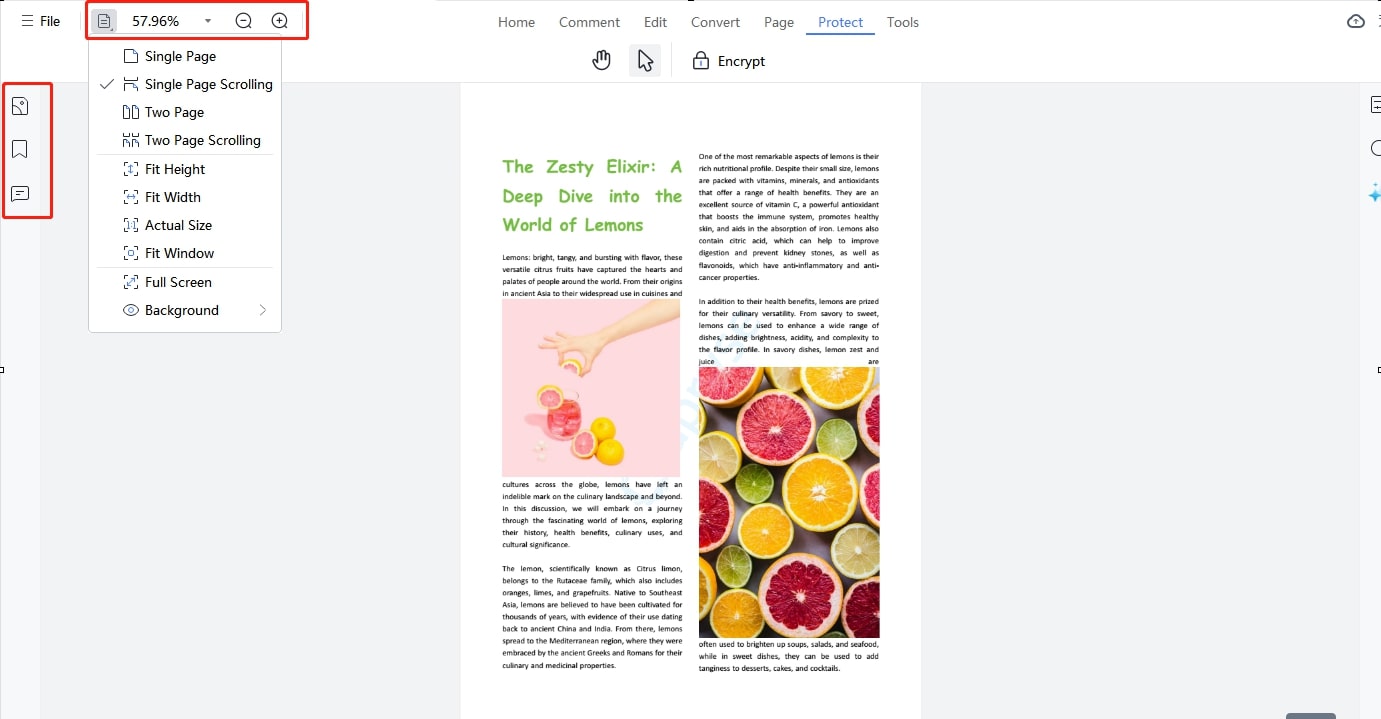
- Step 1: Open the document you want to read using the "Open PDF" button.
- Step 2:Use the navigation tools to scroll through the pages or jump to specific sections. You can also choose different viewing mode: single page, two page, fit height, fit width, etc, and the "zoom in", "zoom out" options are also there for your choice.
Part 3. Settings
PDNob PDF Editor also provides customizable settings to ensure the application works the way you want it to.
3.1 Properties Settings
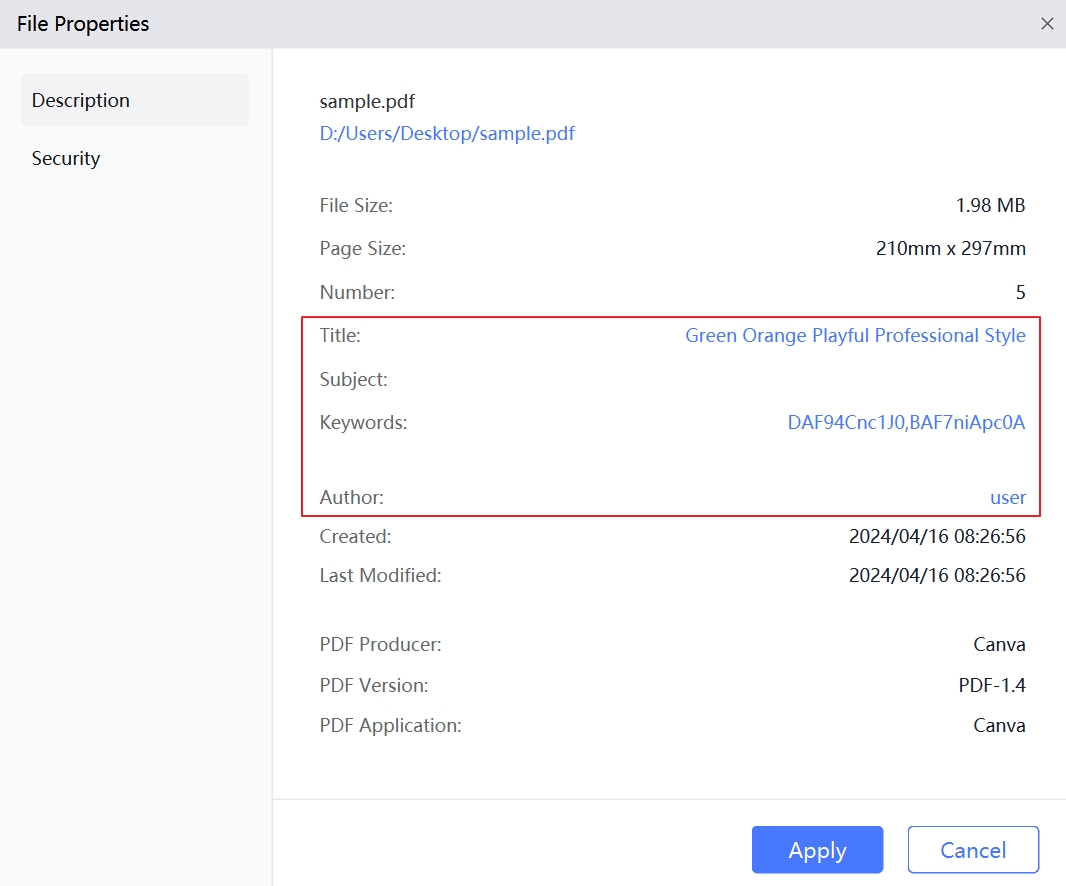
In "Properties Settings", you can adjust the metadata and other settings of the file you're editing.
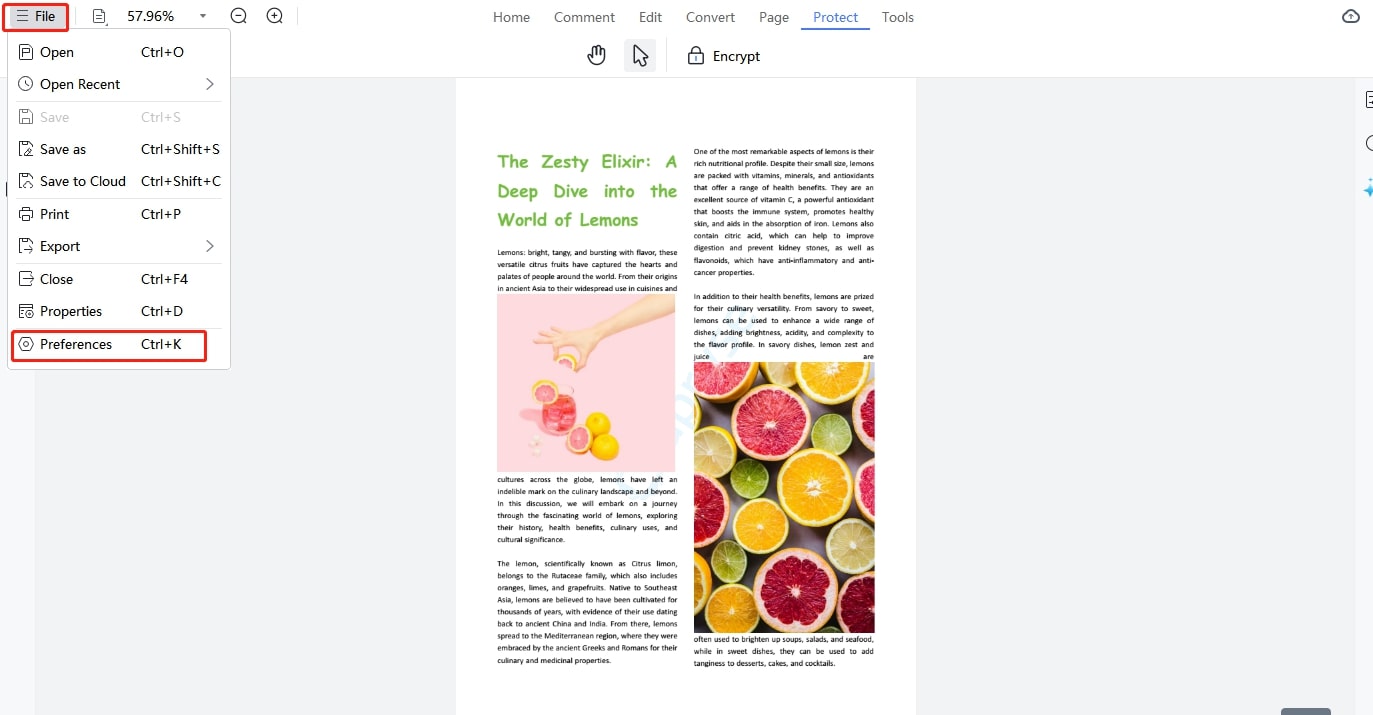
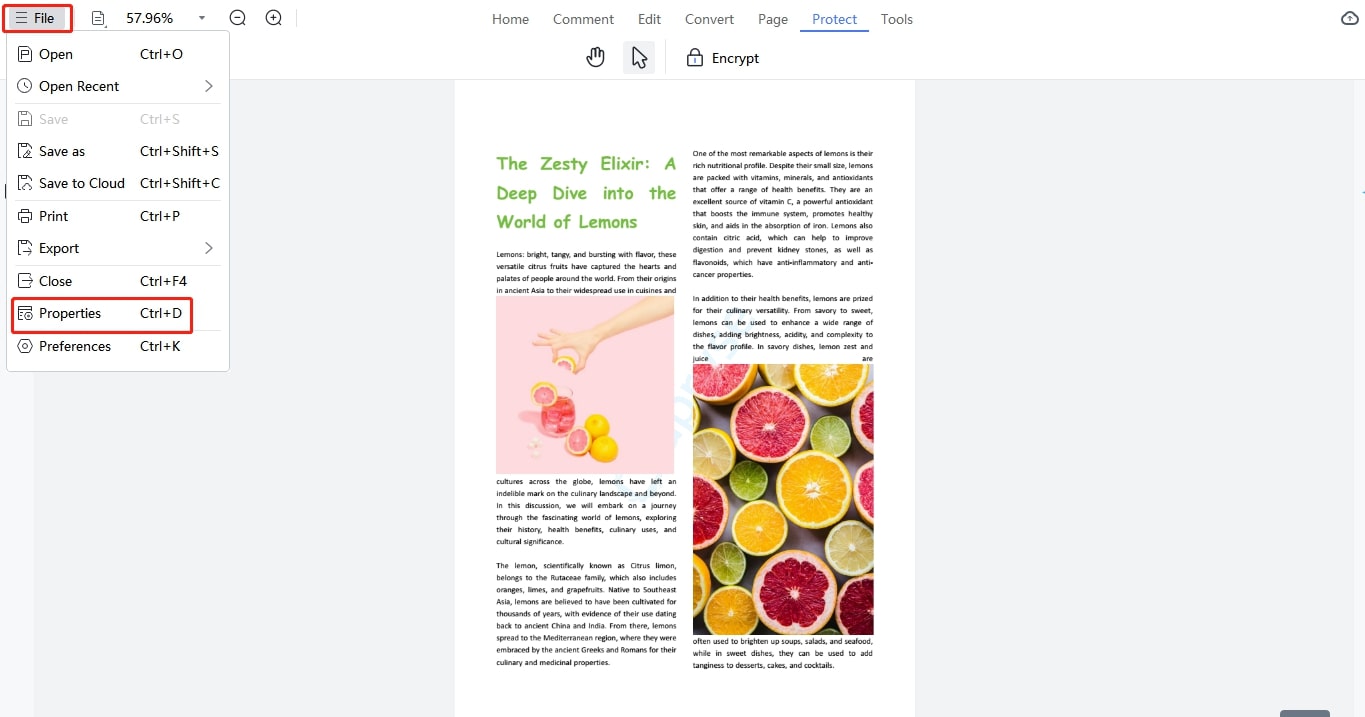
- Step 1: To begin, select the file whose properties you want to edit. Click on "File" in the top-left corner, then navigate to "Properties" to access the settings.
- Step 2: You can edit the file's title and view all other properties. You can also modify subject, keywords, author's name with the file.
3.2 Preferences Settings
The "Preferences Settings" in PDNob PDF Editor allows you to customize the software’s appearance and functionality according to your needs. This includes adjusting general settings, layout preferences, and performance options to ensure an optimized user experience. Here’s a step-by-step guide to configuring your preference settings:
- Step 1: Navigate to the top-left corner of the application and click on the "File">"Preferences" to open the Preference Settings window.
- Step 2: "General Setting": you can configure the list of recently opened files and choose the option to restore the last viewed settings when accessing documents. Additionally, you can modify the save settings to help prevent data loss.
- Step 3: "View Setting": This section allows you to personalize how the PDF viewer behaves.
- Page Layout: Choose between single-page, continuous scrolling, or two-page views.
- Zoom Settings: Set the default zoom level when opening a PDF file.
- Navigation Tab: Select between page or bookmarks only or others
- Default selection mode: Like you can use hand or arrow icon
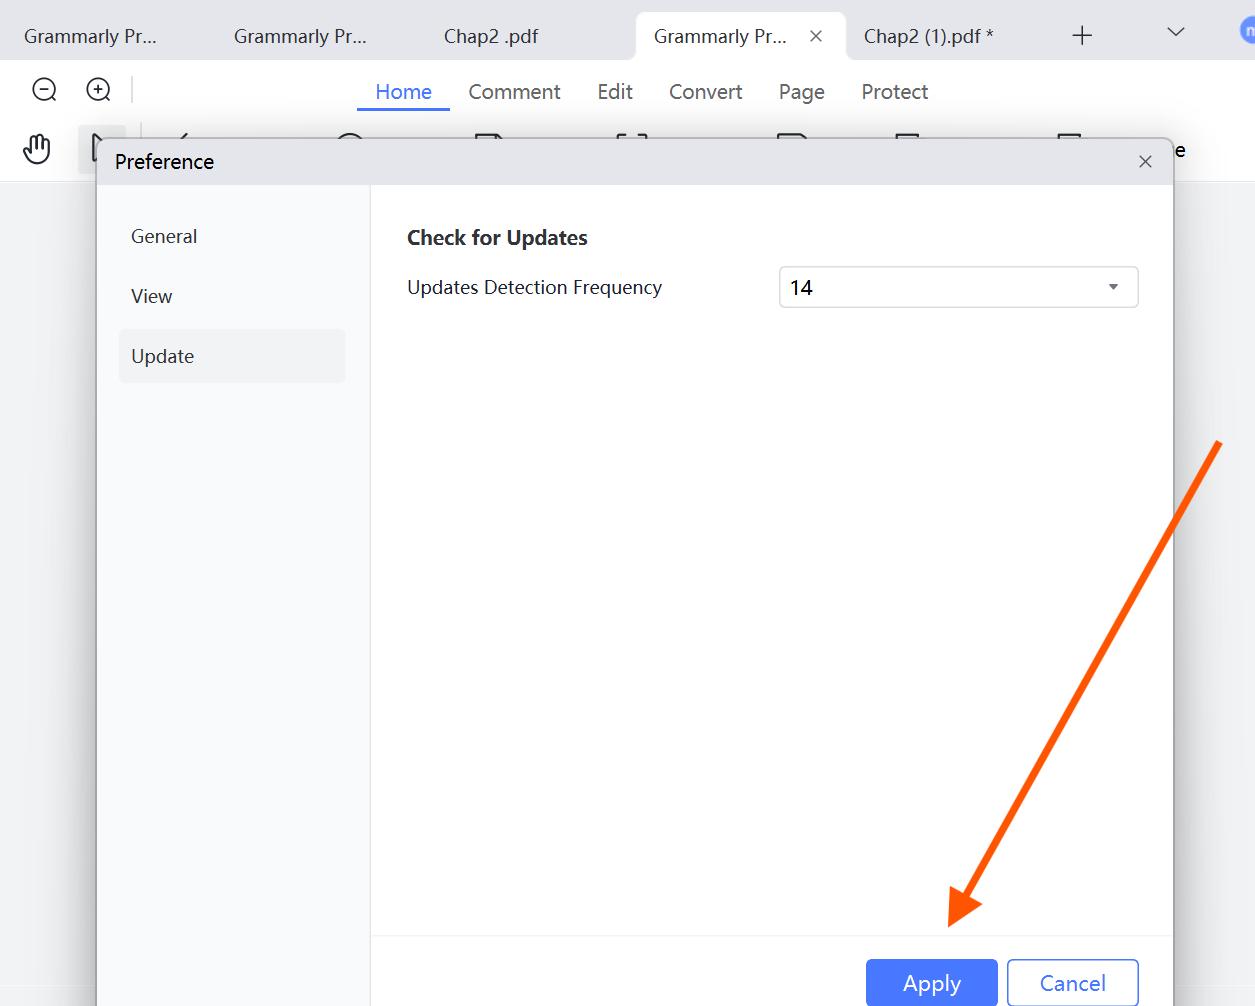
- Step 4: "Update Settings": you can select the frequency of update the product.
- Step 5: Once you have made all necessary adjustments, click "Apply" to save the changes. By configuring your "Preference Settings", you can tailor PDNob PDF Editor to suit your workflow, making it easier and more efficient to manage your PDFs.
