How to Schedule Shutdown Windows 10?
Imagine that you have a really important project that you need to work on, but you don't want to leave your computer on all night while it runs.
You know that leaving your computer on for an extended period can drain the energy and potentially cause issues, so you decide to schedule a automatic shutdown windows 10.
This way, you can set the project to run overnight, knowing that your computer will turn off automatically at a specific time. Windows 10 allows you to do this in 6 ways:
Let’s see how you can schedule shutdown Windows 10.
Create Basic Task Wizard to Schedule Power on Windows 10
You will need a Task Scheduler tool in order to do this. This tool allows you to schedule a specific action, such as turning on your computer, to occur at a specific time or on a specific schedule. To do this:
Search for Task Scheduler in your Windows 10 Start menu and press Enter to open the tool.
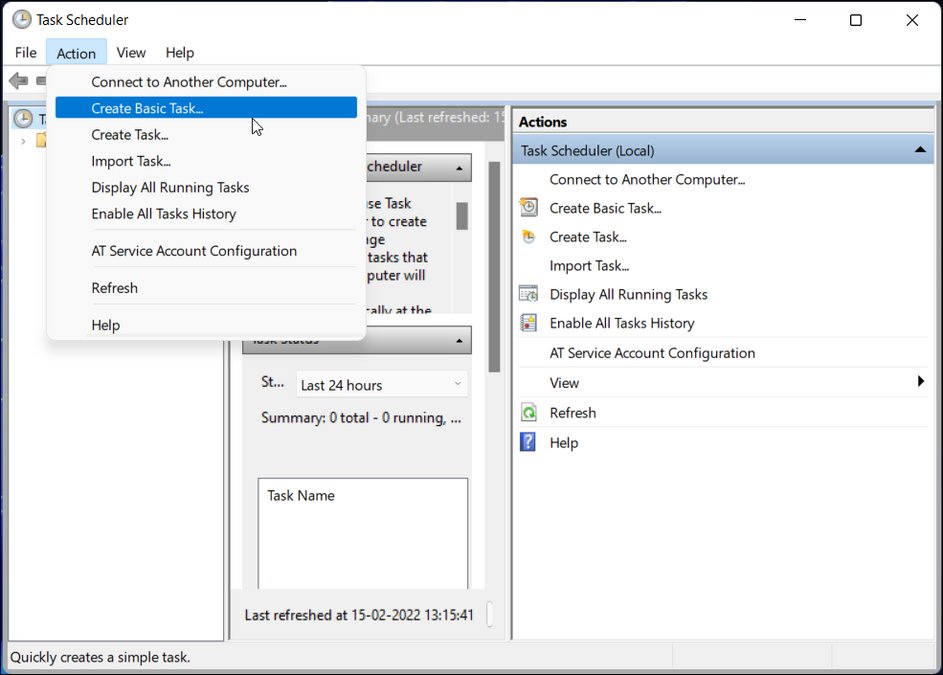
In the Task Scheduler window, click on the Create Basic Task option in the Action tab.

Give your task a name and description, for example, Shutdown, and then click Next.

Choose how often you want the task to occur by selecting one of the options under Trigger. For example, you might choose Weekly and specify a day and time for the task to occur and then click Next.

Select the Start a program option under Action.

In the Program/script field, type shutdown.exe (without the quotes). In the Add arguments field, type /r /t 0 (without the quotes). This will tell the task to restart your computer and set the time to zero seconds.
Click Finish to save your task and close the wizard.
Voilà. That’s how you schedule shutdown Windows 10.
Tips: How to automatically shut down on idle on Windows 10
You can apply some tips to automatically shut down Windows 10 when it is idle:
You can use the Task Scheduler tool to create a task that will shut down your computer after a certain period of inactivity. Refer to the above steps to create a shutdown.exe task.
You can adjust the power settings on your computer to shut down when it is idle. To do this, go to the Start menu and search for Power Options. In the Power Options window, click on the Change plan settings link next to your current power plan. Then, click on the Change advanced power settings link.
In the Advanced Power Options window, expand the Power buttons and lid option and the Lid close action option. From here, you can choose to have your computer Do nothing, Sleep, or Shut down when the lid is closed.You can also use a third-party tool to shut down an idle computer.
There are many utilities available that can monitor your computer's activity and shut it down when it is not in use. One good example is PDNob Shortcuts.
How to Auto Shutdown Windows 10 software using PDNob Shortcuts
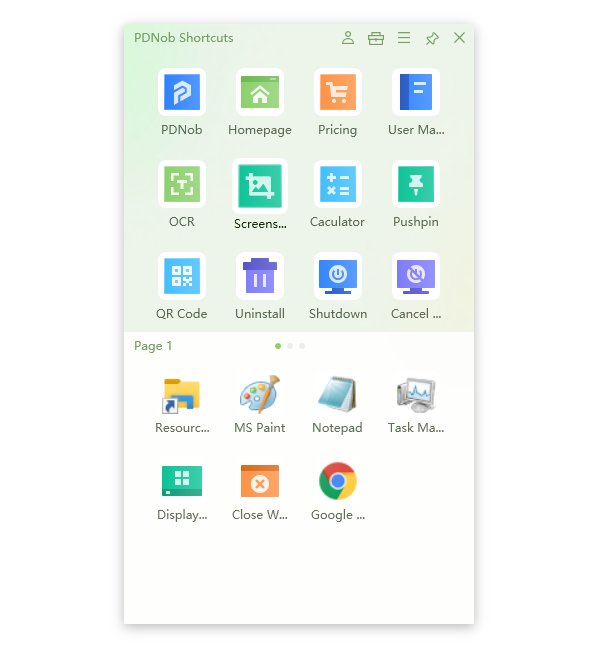
PDNob Windows Shortcuts is a small utility that allows you to create shortcuts for common power actions on your Windows 10 computer, such as shutting down, restarting, or putting it to sleep.
You can then save these shortcuts on your desktop for easy access, or you can even assign them to specific keyboard keys or mouse buttons. To create a shortcut for shutting down your computer using PDNob, follow these steps:
Launch PDNob Windows Shortcuts successfully with an automatic Shutdown Windows 10 shortcut.
Download nowSupport win 10 / 8.1 / 8 / 7Secure Download
You can click on this shortcut to automatically shut down your computer.

You can also assign this shortcut to a keyboard shortcut combination. Simply press the keyboard shortcut and your computer will begin the shutdown process. To do this:
Right-click on the icon and select the create shortcut key field.
You can assign a specific keyboard key or combination to the shortcut. For example, you can use Ctrl + Alt + S to shut down the computer and hit Save. That’s it.
You can also edit, copy, cut, or delete your shutdown keyboard.
How to cancel auto shutdown Windows 10
Likewise, PDNob Shortcuts allows you to cancel automatic shutdown Windows 10. To do this:
Launch PDNob Shortcuts and click the Cancel shutdown shortcut to cancel the shutdown process.

You can also right-click the shortcut to create a keyboard shortcut for this process.
Windows 10 auto shutdown Command
The shutdown command in Windows 10 is a command line utility that allows you to shut down or restart your computer.
It can be accessed by opening the Windows 10 command prompt or Powershell and typing in shutdown followed by a series of options to specify how you want your computer to shut down.
You can use the -s option to shut down the computer, or the -r option to restart the computer. The -t option lets you specify a time delay before the shutdown or restart occurs while the -f option will force any open programs to close without saving changes.
The best part about this is you can set shutdown timer Windows 10. If you want your computer to shut down in 1 minute, you can use this command shutdown -s -t 60. This automatically shut down your computer in 60 seconds.
To schedule a shutdown in Windows 10 using the command prompt, follow these steps:
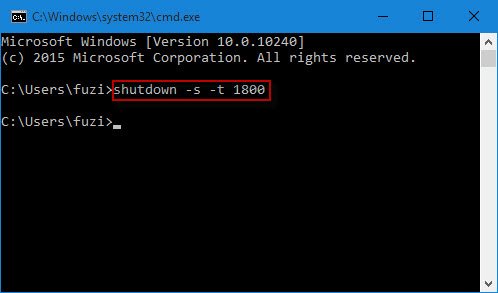
Press Win + X to open Command Prompt.
Type shutdown –s –t 1800 and press Enter. This will schedule a shutdown in 1800 seconds or 30 minutes.

Let’s see how you can do this via Windows Run Dialog box and Powershell.
Windows 10 scheduled shutdown via Run Dialog Box
To schedule a shutdown in Windows 10 using the Run dialog box, follow these steps:
Press the Windows key + R on your keyboard to open the Run dialog box.
In the Run dialog box, type shutdown -s -t 600 and press Enter. This will schedule a shutdown in 600 seconds or 10 minutes.

If you want to specify a different time delay before the shutdown occurs, simply replace the number 3600 with any number of seconds you want the shutdown to be delayed. For example, to schedule a shutdown in 30 minutes, you would type shutdown -s -t 1800. This is shutdown timer windows 10.
If you want to cancel the scheduled shutdown, you can do so by typing shutdown -a in the Run dialog box and then press Enter. This will cancel any scheduled shutdowns.
Windows 10 scheduled shutdown via Powershell
This process is straightforward. To do this:
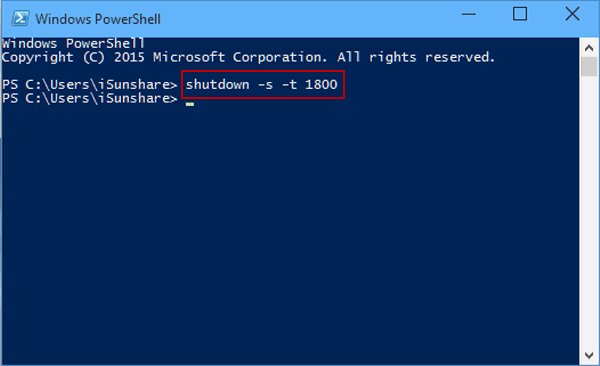
Type in Powershell in your Windows Start menu and press Enter to launch Powershell.
Type in shutdown -s -t 60 to and hit Enter.

This will schedule your computer to automatically start the shutdown process in 60 seconds.
How to Create Desktop Shortcuts for Automatic Shutdown Windows 10
To create a desktop shortcut for windows 10 auto shutdown, follow these steps:
Right-click on an empty space on your desktop and select New followed by Shortcut.

In the "Type the location of the item" field, type in the following command: shutdown -s -t 00. This command will tell Windows to initiate a shutdown with a timer of 0 seconds.

Click Next and give the shortcut a name, such as a Shutdown Shortcut.
Click Finish to create the shortcut.
You should now see the shutdown shortcut on your desktop. To use it, simply double-click on the shortcut and your computer will begin shutting down.
Note that this will not give you the opportunity to save any open documents or files, so make sure to do that before using the shortcut.
Conclusion
By now, you should know how to automatic shutdown Windows 10 using the above methods.
The best part, you can use PDNob Windows Shortcuts easily shutdown your computer and cancel the shutdown process with just one click. This tool is easy to use, and fast.


